Getting verified guide: Difference between revisions
No edit summary |
|||
| Line 27: | Line 27: | ||
Bittylicious will have sent you an email. If you do not see it, please check your spam folder, especially if you are on Hotmail/Outlook. | Bittylicious will have sent you an email. If you do not see it, please check your spam folder, especially if you are on Hotmail/Outlook. | ||
There will be a link in that email which confirms | There will be a link in that email which confirms that your email address is correct. Please click on this link and you will be logged in. | ||
=Step 3 - Go to the profile page= | =Step 3 - Go to the profile page= | ||
Revision as of 16:06, 8 June 2020
Introduction
Getting a fully verified account at Bittylicious is very easy and enables you to have higher purchasing limits and get better prices.
We recommend all customers go through the verification process and if you choose to do this, we require documentation in the form of one proof of name and one proof of address. We store all documents securely and have a data protection registration.
Step 1 - Register new account
First, go to the registration page. This should look like the below:
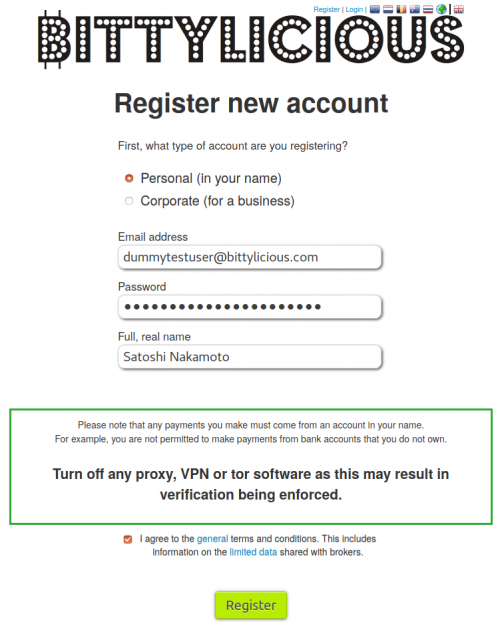
Fill in the following information:
- Type of account:
- Personal (for most normal accounts)
- Corporate (if you are trading as a company or sole trader).
- Email address: Your real email address.
- Password: A secure password, either very long or with numbers and letters. This cannot be a regularly used password on the Internet, like password123456.
- Full, real name: Your real name. Please do not put in a fake name - it will be detected.
Make sure you tick on the box saying you agree with the terms and conditions and then click Register.
Step 2 - Check your email
Bittylicious will have sent you an email. If you do not see it, please check your spam folder, especially if you are on Hotmail/Outlook.
There will be a link in that email which confirms that your email address is correct. Please click on this link and you will be logged in.
Step 3 - Go to the profile page
Once you are logged in, you will see a yellow/green bar which is the main menu. If you click on Profile you will be taken to the profile information pages.
Step 4 - Declaration
The Basic settings page has three sections:
- Profile information: Basic information which should match what you entered in the registration page.
- Declaration: Any special conditions on your account (see below).
- Notifications: Information on when you wish to be notified by us.
You will need to choose one option in the declaration section below:
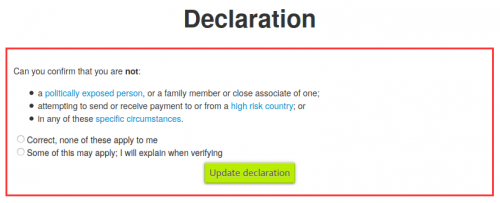
You can find out information on what is required by clicking on the appropriate links in blue.
For most people, clicking the first Correct, none of these apply to me option and then Update declaration will be the correct choice. However, please read these conditions carefully and click Some of these may apply if appropriate. It simply means that we as we have to ask for further information from you before verifying your account.
Step 5 - Go to the verification page
The next step is to go to the verification pages. This will lead to a user-friendly "wizard" where you can follow each step easily.
Click on the Verification link in the purple bar towards the top of the page.
Corporate accounts
At this point, the process differs if you are registering a corporate account. If this is the case, please follow the Getting verified guide for corporate accounts page.
Step 6 - Personal details
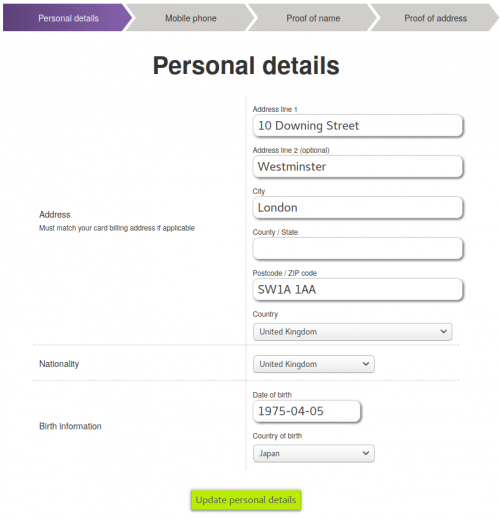
Please fill in basic personal details on this page. This includes:
- Address: Your full, real address that you receive correspondence. Bittylicious will match uploaded documentation to this later on.
- Nationality: Your primary nationality.
- Birth information: Your date of birth and country of birth.
After you have entered this information, click on Update personal details and you will be taken to the next page.
Step 7 - Mobile phone verification
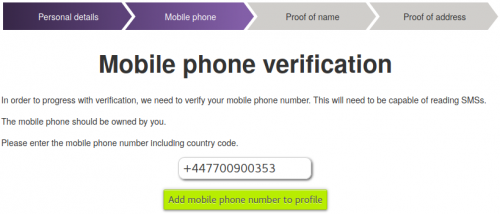
Please enter your mobile phone number here including the international prefix, e.g. +44 for the United Kingdom.
Click Add mobile phone number to profile and Bittylicious will send a SMS (text message) to your mobile phone number.
Step 8 - Enter SMS verification code
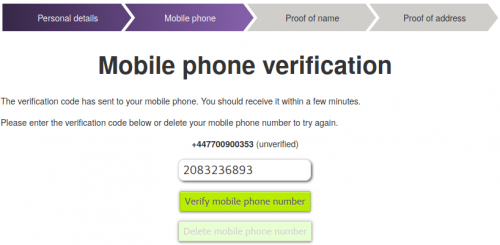
Please enter the SMS code received on your mobile phone into this box and click Verify mobile phone number. In this case, we assume you received the code 2083236893 but you probably received something else.
If you made a mistake with your mobile phone number, you can click Delete mobile phone number to try again. You can only do this a limited number of times.
Step 9 - Proof of name documentation
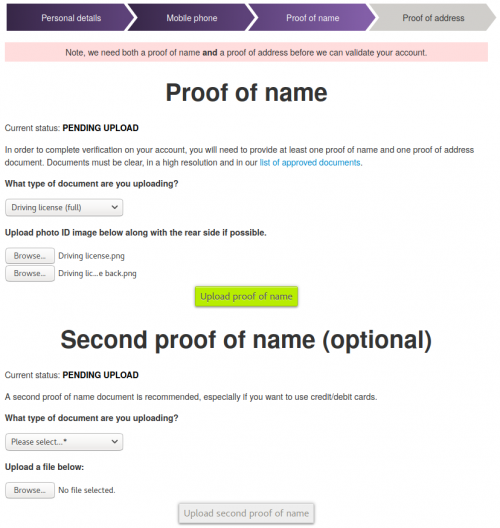
Here, you will need to upload suitable proof of name documentation. This must be one of the documents that we permit but in general, this is governmental photo ID.
You need to select the type of document you are uploading first. Then, you need to click Browse... to choose a file corresponding to a photo of your ID. Click on the next Browse... button to upload the reverse of the document if appropriate, e.g. for a driving license.
Once you have selected the documents, click Upload proof of name. A yellow progress bar will be displayed, and afterwards, you will be directed to the Proof of address page.
On this page, you are also welcome to upload a second proof of name. It is recommended to do this if you have one available, e.g. a passport and a driving license.
Step 10 - Proof of address documentation
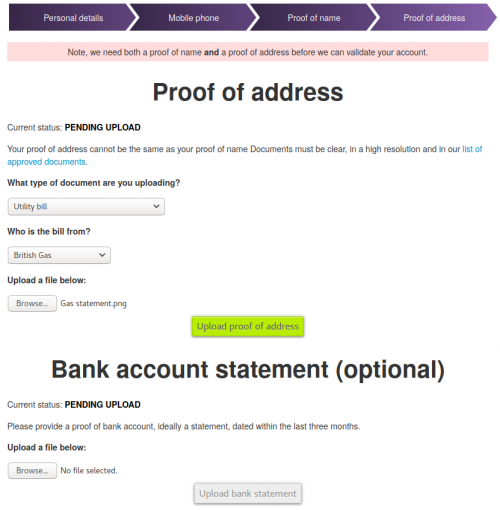
Here, you will need to upload suitable proof of address documentation. This must be one of the documents that we permit but in general, this is well known statements from well known companies sent to your residential address.
You need to select the type of document you are uploading first. Then, you need to click Browse... to choose a file corresponding to a photo of your proof of address. This can also be a PDF downloaded from your provider's website (e.g. a downloaded gas statement).
Once you have selected the document, click Upload proof of address. A yellow progress bar will be displayed, and afterwards, your verification documents will be submitted.
On this page, you are also welcome to upload a bank account statement. It is recommended to do this if you have one available.
Step 11 - Wait for verification
Once you have done this, you will see a small, green bar saying that your documents are in the queue for verification.
During the UK working day, this usually takes a few hours maximum. During the night, please expect to wait until the next morning for your documents to be verified.
If anything is wrong with your documents, Bittylicious will detail the reasons in an email which will be sent out. We are friendly, so please feel free to drop our support team an email if you are struggling in any way. We respond very quickly.

